
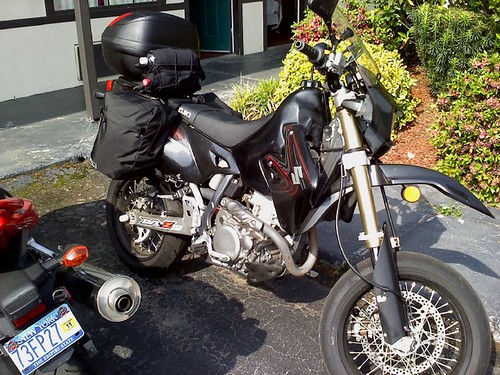
My goal with replacing my stock gas tank was really twofold: on my normal commute I don’t want to have to get gas every day (my range is 100 miles before reserve on the stock tank – about 60 mpg!) and on our long rides with friends I didn’t want to be the one who dictated fuel stops (our friend Janice has about a 150 mile range). The 3.9 buys me 200 miles before reserve. PERFECT. Plus the Clarke 3.9 Gallon tank seemed to require the least mods of the other versions I’d looked at.
The tank itself is a little taller than the stock tank, and it carries fuel in the lower flanges. It ever-so-slightly changes the angle of the front of the seat once it’s all installed but I didn’t find it to be uncomfortable. I sat a teensy bit further back on the seat, I think. Not having man-parts I can’t speak to the reputation of these larger tanks as being “ball busters.”
Steps for installation:
beforehand: rinse out the new tank to get out any junk left over from the making of the tank
1. take off all the side panels and the seat
2. Drain the gas tank from the petcock into a clean gas cannister (there’s no “off” switch on my DRZ petcock – just a reserve, on, and prime.
3. unscrew and remove the gas tank from the bike
4. unscrew and remove the petcock from the tank
5. put the petcock into the new tank (we had to widen the holes out a little, they were not well drilled out and there were some plastic flaps there that we had to cut away)
6. mount the new tank onto the bike
7. reconnect the petcock, put some gas in and check to make sure there were no leaks
8. start the bike to make sure it works (remember to reconnect the breather hose so you get vacumn – we didn’t do this, and had a few minutes panic until I remembered that this was a common problem with these tank installs – either the hose was forgotten or it was kinked)
9. thread the support wire through the front of the bike and screw it onto the tank
10. put the plastics and seat back on, mounting it onto the gas tank and shoving it into place (the shape of the tank is a little taller in front, so it has to be jimmied in a little bit to make sure you can bolt down the back.
I was surprised at how easy this was! gasoline is intimidating to me, probably because I’m an environmental engineer by day and clean up other people’s fuel spills constantly – but we had no mess and it went together in about an hour. The most significant amount of time was definitely carefully draining the original tank. If I had been better at running out of gas on my way home from work on Friday, we wouldn’t have had to take so long.
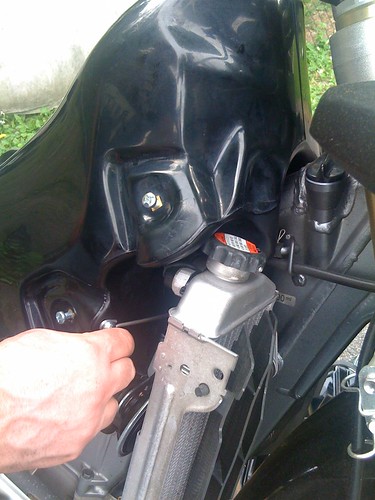
You can’t really see it, but the choke knob is covered by the lower flange of the tank. I was worried that after the tank was fully installed we wouldn’t be able to pull the choke out – but it still pops out about 85% of the way, which so far has been good enough. I just have to hook my fingers down underneath the tank to pull it out.

and here’s a picture of the gas tank with the support wire. you can also see how the radiator cap is covered a little by the tank. hopefully we never have to find out if it’s possible to get the cap off without taking the gas tank off again. Getting that fiddly support wire on, by the way, was a real hassle. It’s tight working quarters and it was a real hassle to seat it correctly.

Hi Karina, thanks for the post about your tank install. I had some trouble installing my clarke tank today and I was wondering what your experience was with this one step… (oh I have a 2011 drz 400 sm!)
So when you put the tank on and hook that one white plastic tab under the seat to that silver metal spine tab thingie they put on the tank…how did that go for you? my boyfriend and I both with all the pushing and shoving and bending and forcing could not get the spine in the seat so that we could screw in the back two bolts. you mentioned your install was easy so I guess you never came up against that problem?
5b4143efd6f5d2a20854899.com
5b4143efd6f5d2a20854899.com 8dav7
topfuck123gals.mobi
topfuck123gals.mobi CsgQZ
topfuck123gals.mobi
topfuck123gals.mobi USXCj
topfuck123gals.mobi
topfuck123gals.mobi Cjio4
topfuck123gals.mobi
topfuck123gals.mobi 1cr
topfuck123gals.mobi
topfuck123gals.mobi ru1Okj
topfuck123gals.mobi
topfuck123gals.mobi An8hS
topfuck123gals.mobi
topfuck123gals.mobi 3rJ1Q
topfuck123gals.mobi
topfuck123gals.mobi KZG2l